Tuesday, October 23, 2018

Olivia's Progress, Day 2


Olivia is a quick learner. With those ears, she's a great listener, as well; and that's a good thing, because for now, I'm just doing a lot of talking to her. Today, though, she made great progress. I turned her out in the turnout for a couple of hours this morning, hoping she'd return to her stall voluntarily when she saw me put the feed inside, but she didn't. It took only a moment to usher her in with a driving whip.

For the uninitiated, the driving whip is but an extension of one's hand. It isn't a tool of abuse or striking; it's a way of safely reaching out toward an animal in a non-threatening manner. It is the driving whip that I'll use to teach her to trust me touching her legs; burros are accurate and lightning-fast kickers, and it's far better that they kick at a whip than at me face, hand, or leg.

Once inside her stall, Olivia promptly and quite happily busied herself eating her hay. First, though, to my delight, she approached me and again touched me with her nose and sniffed my hair. Satisfied I was not a threat, she settled down to breakfast. After some conversation and a few more country songs, I decided she was comfortable enough for the next step in our relationship.

I slowly worked my way toward Olivia, mindful of that quick back end, and when she retreated to the other corner of the stall, I followed. I extended my hand first, palm up so as not to appear threatening, and she indicated her willingness to continue by reaching out and sniffing my hand. That's a good sign.

I picked up the driving whip and extended it very slowly, letting her sniff it also, and when she reached toward it, I stepped back a little. She eventually let me touch her on the shoulder with it. I used it to touch her neck, side, and belly.

To my surprise, she was fine when it made contact with the underside of her belly. A lot of equines are ticklish there and will react negatively, but Olivia was perfectly happy. I put the whip down and moved closer to her empty handed.


I was astonished at how trusting Olivia was. She didn't even fudge when I reached out and put my hand on her withers. Her ears slightly back with attentive apprehension, she let me pet and scratch her neck, side, and chest, resisting only when I rubbed her eyes (but minutes later accepting that as well). She wasn't ready for me to touch her lower leg, but no matter - I am thrilled at what progress we made. She's coming along far faster than I'd have anticipated.


Many times, the way to an animal's heart is to scratch what itches. Livestock, like cats and dogs, often have favorite scratching spots. I haven't found Olivia's yet but she seemed warily happy to have me try.

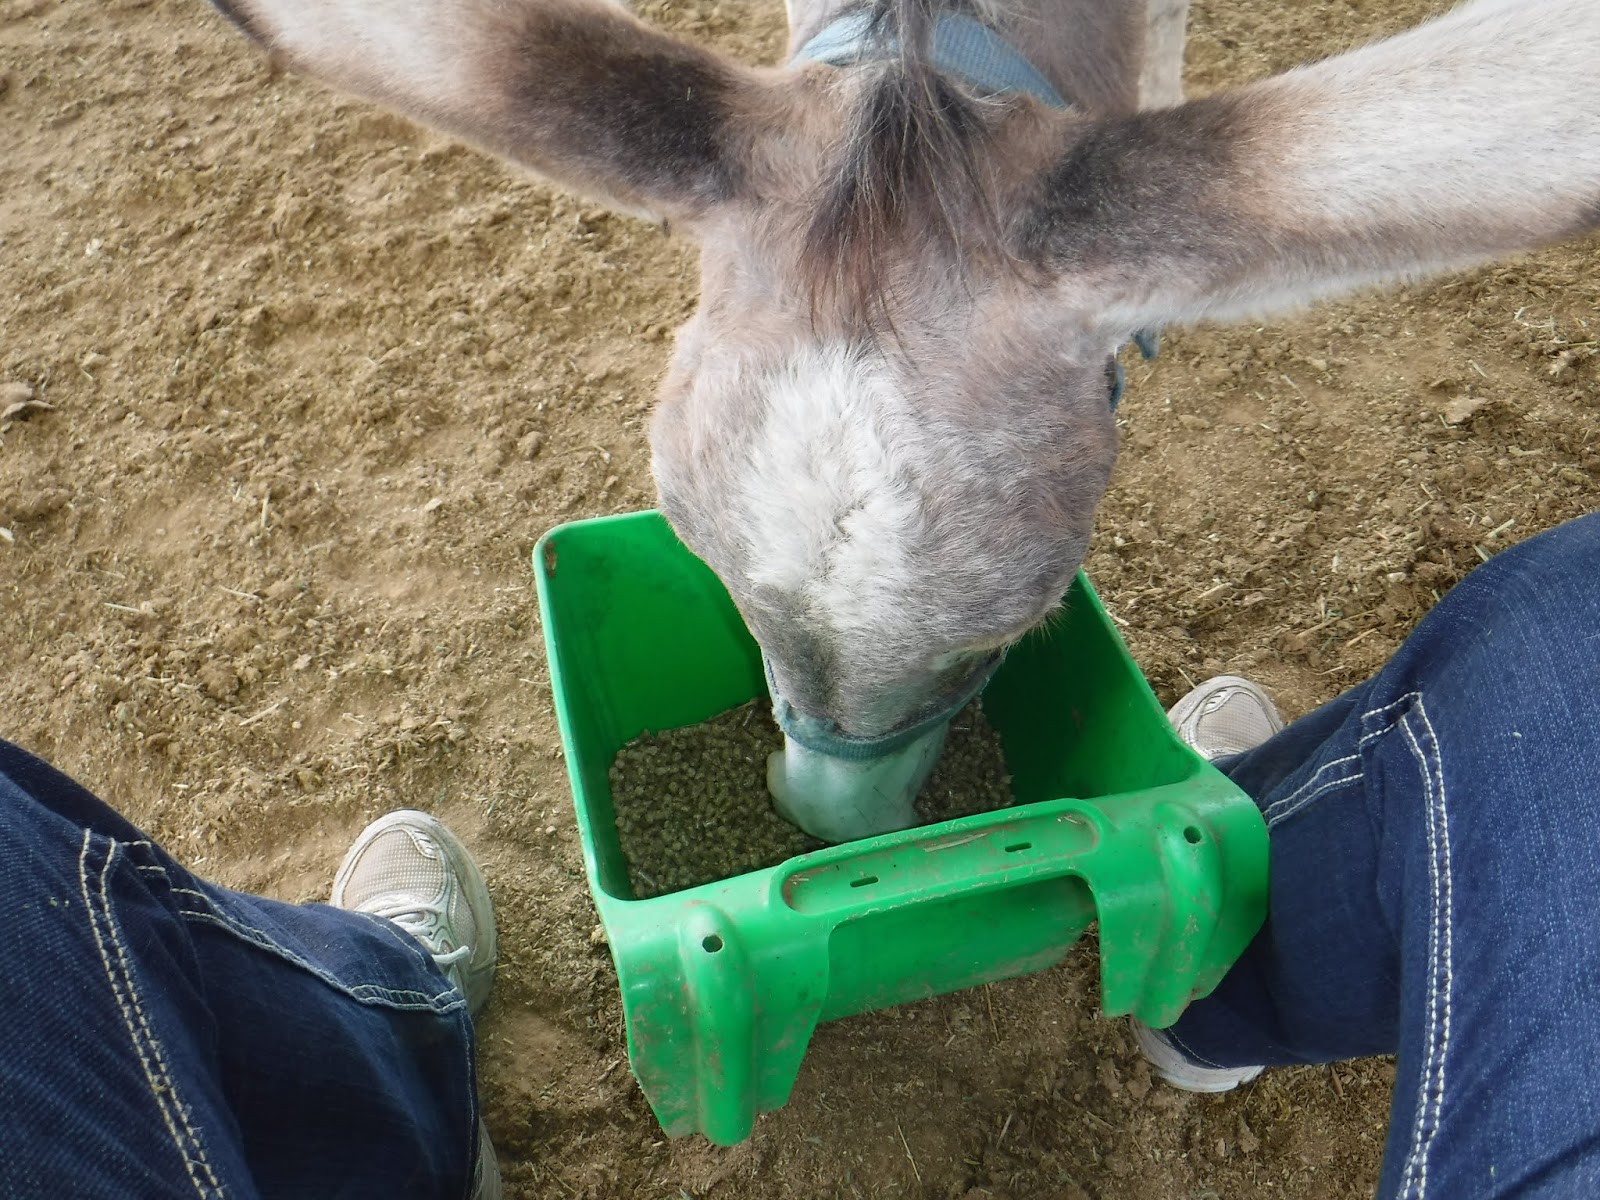
Although not emaciated, Olivia is definitely on the lean side. A fat burro isn't a healthy burro, but she'll benefit from gaining some weight; in the top photo, you can see how meager she is above the hips and along the ridge of her back. I have her on timothy hay, bermuda pellets, and just a handful of  timothy / alfalfa chop. She wasn't crazy about the Calf Manna I gave her, but when she acquires a taste for it I'll add it to her feed to give her a bit of a vitamin boost. I'll also start her on a small amount of rice bran to help her coat bloom. Of course, she has a mineral salt lick available as well. Below, she's enjoying her bermuda pellets. As a side note, I chose the bermuda pellets because the vendor I visited to pick up some hay for her the other night was out of bermuda - the recent rainfall has ruined many crops - and as she had been on bermuda hay before I adopted her, the best substitute I could find in a pinch was pellets plus a beautiful, clean compressed bale of timothy. I like the timothy so well I will probably leave her on it.


Copyright (c) 2018 MJ Miller * All rights reserved * No part of this content, including photographs, may be reproduced without the express permission of the author * Links, however, may be freely shared and are appreciated * Thank you for linking, liking, tweeting, sharing, and otherwise helping grow my readership * Most of all, thanks for stopping by!


Monday, October 22, 2018

A Burro's Progress: My BLM Burro Arrives

Meet Olivia.


One of the infinite joys of the equine world is even after a half-century of working with them, there's always a new experience, a new pleasure, a new goal to be achieved. Since reading Marguerite Henry's "Brighty of the Grand Canyon," as a child, I've wanted a burro - but not just any burro, I wanted to adopt a BLM burro that once roamed my home state here in Arizona. The timing hasn't been right, before now; sometimes life is a series of speed bumps and cul-de-sacs. Yesterday, the forces of nature aligned and, thanks to the help of my forever friend Cindy Mathers and a talented young horsewoman named Christen Milhon, I brought home Olivia.

Until just a few weeks ago, Olivia ran feral in the Cibola region of Arizona, when she was rounded up. Olivia was put up for adoption three times, without success, at which point she was available for direct sale to the public. Christen Milhon steps in on as many of these situations as she can and rescues burros and mustangs before they end up in the kill pen. Olivia (whom she had called "June") was a recent rescue.

I dubbed the lovely three-year old burro "Olivia" in honor of Olive Oatman, the famous pioneer Arizona woman who'd been kidnapped by natives, her face tattooed, before eventually being rescued. Olive's family gave its name to the small town of Oatman, famous for the burros that roam the streets and sidewalks and beg treats from tourists.

Olivia had the advantage of a short time with Christen, but is neither tame nor halter broke. She's cagy and apprehensive, but neither aggressive nor ill-tempered. She has a sweet eye and responds sensibly. She watches everything - I like that trait in an animal (as well as in people) - and I know she'll learn a lot simply by watching everything I do in the barn area, and that will inform my work with her.

Because Olivia is an observant beast, I waited to feed her until last today. I wanted her to focus on watching my every move. Although burros are notorious for aggression towards canines and wildcats, I let the large dogs out this morning so she could begin to familiarize herself with them - and they with her. Ethan, the rambunctious McNab pup, is a vocal dog and initially barked at Olivia, recognizing her as a new sort of creature unlike the horses, goat, or cattle. As soon as Olivia gave him a side-eye and shifted her ears in his direction, he'd quickly dodge out of the pen.

Once I'd cleaned the barn and fed everyone else, I brought a mounting block as a seat, a cup of coffee, a flake of timothy, and a bucket of bermuda pellets for my first session with Olivia.

I plopped the bucket down just in front of my foot, sipped my coffee, and waited. Within a few minutes Olivia ventured forth and checked out the bucket.

After a few minutes, a tentative Olivia was eating happily, but alertly, while I sat. I tried to make some non-threatening noise and, I admit, I sang Hank Williams songs to her. If you had ever heard me sing, you'd consider that threatening, or torturous, but Olivia seemed calmed by it.

I avoided reaching out to her in any way. Prey animals instinctively view those extended arms as outstretched claws until they have learned to trust you. I'm in no rush, and I let Olivia just munch her food.


After a few more minutes, I moved the bucket of pellets between my feet. Olivia wasn't pleased, and wandered off to the other side of the stall for a bit, acting uninterested in the food. Of course, she soon came back.

Olivia, fairly confident now, was unconcerned as she munched her breakfast. Every few minutes, Ethan would approach; Olivia was more trustful, now, and merely watched him. Every so often, Ethan being Ethan, he'd bark.  I'd also let Lily, the goat, out during morning chores. Lily came by regularly, her goat-bell clanging, and Olivia gave her a curious, almost welcoming look.

Finally, I reached down slowly and rested my hand on the bucket. A few minutes later, Olivia returned and ate from the bucket, her nose just inches from my hand. Again, I never tried to pet her; I just was.


That was it for my first session with Olivia: just letting her decide it was safe to approach and be near me. A few times during the session, of her own volition she reached out and touched my hair and face with her muzzle, smelling me. I took advantage of these moments to deeply exhale, communicating to her my sense of peace and calmness. Eventually, she'll learn, as the horses do, to draw confidence from those moments: if the herd boss (me) isn't alarmed, neither will she be. 


Copyright (c) 2018 MJ Miller * All rights reserved * No part of this content may be reproduced, including photographs, without the express permission of the author * Links, however, may be freely shared and are appreciated * Thank you for linking, liking, tweeting, sharing, and otherwise helping grow my readership * Most of all, thank you for stopping by!


Wednesday, August 15, 2018

How to Make Tempting Mashes for Feeding Medications to Your Horses

It happened again last night: an after-dark emergency veterinary call-out. Four-month old Julie, Chica's filly, had managed to rip a 3-inch section of her nostril into a dangling flap of carnage. After the sutures were knotted snugly into place, it was up to me to keep Julie on antibiotics and anti-inflammatory medication.

Rather than make a paste of the antibiotic (SMZ tablets) and use a needle-free syringe to squeeze it into a not-so-eager mouth, I prefer mixing medications into a bran or grain mash. Should you have to do this - whether feeding pharmaceuticals or supplements - here is my method, with hopes it's useful to you.

Prepare in advance of emergencies. For me, this means keeping the antibiotic on hand so when the vet says, "Give SMZ for ten days," I have a ready supply. I also keep red bran, grain, and either molasses or dark Karo corn syrup available for making a tasty mash that hides the flavor of the medication or supplement.

For older horses, I mix equal portions of red bran and whatever grain they prefer. I use the universal barn measuring device: A one-pound coffee can. For feeding SMZ, I fill a glass jar with a cup or so of fresh water, drop the recommended dose of tablets inside, and let it sit for about ten minutes. It dissolves fairly quickly. For some reason, SMZ doesn't dissolve as nicely if you pour the water onto it rather than dropping it into water. Go figure.

Don't add the molasses or corn syrup to the water / SMZ mix, or you'll be frustrated trying to scrape it out of the jar. Wait until you've poured the water / SMZ solution onto the bran / grain mix, then add the flavoring syrup and stir well. I use a carrot to stir, and then sticky, bran-covered carrot becomes part of the mash.

Other additives your horse may like: Carrot shreds, salt, apple bits, pellets, or horse treats. Not all horses accept carrots, but if your horse likes them, go for it. Shredding them is preferred as they may otherwise steal the carrot and leave the rest, or may dump some of the mash out trying to get the uncut carrot.  You know your horse and what his prankster rating is, so feed accordingly.

For young horses, carrots may not yet be an option as they may not have developed a taste for them yet. In Julie's case, she didn't like the red bran, either, and she didn't want to finish the entire mash I made. I separated her from her mother (mom kept busy just outside the stall eating hay) so Mom wouldn't steal the mash. Julie was a reluctant eater, so the second dose, I used nothing but half a can of junior diet pellets, the SMZ solution, and dark corn syrup. I did not give her any hay until she ate her mash - which took about an hour.

Molasses is a more nutritious choice than corn syrup. It's high in potassium, wonderfully viscous, and almost irresistible. Also, you get to lick the spoon. However, some horses (and I'm looking at you, HYPP-positive horses) can't or shouldn't have potassium. Corn syrup is your best option. It's also readily available in many bakers' pantries. I wanted to use up some corn syrup I had on hand, so Julie's mash will be made with Karo for a few days.

If you don't have either molasses or corn syrup around, you can substitute brown sugar or even pancake syrup. Better idea: put molasses on your list now and keep it in the cupboard. You can even buy a handy two-pack here  on Amazon (affiliate link):  Brer Rabbit Molasses. This is the brand I use. (It's also excellent for those molasses cookies I love.)

If you need to rehydrate a horse or encourage an older horse to eat, try a soupy bran mash. My old girl Holly, Julie's 31-year-old grandmother, loves a sloppy mash of red bran, molasses, senior diet, and carrot shreds. You can add electrolytes if necessary - but realize the potassium in the molasses will give them a boost as well.

Young Julie finishing off her medicated mash this morning.
(c) 2018 MJ Miller

Good luck ... and enjoy that beautiful molasses aroma!


Copyright (c) 2018 by MJ Miller * All rights reserved * No part of this content may be reproduced without the express permission of the author * Links, however, may be freely shared and are encouraged. * Thank you for linking, liking, +1ing, Tweeting, sharing, emailing, carrier-pigeoning, and otherwise helping grow my readership * Most of all, thanks for stopping by!


Saturday, May 12, 2018

Stress-Free Halter-Breaking, Lesson One


Like most contemporary horsemen, I prefer not to put avoidable stress on my horses. Long gone are the days of fighting it out and "breaking" a horse with a snubbing pole and rough handling. I avoid conflict with them when possible and especially so with the babies.

We all have our own way of doing things, though, and there are several halter-breaking methods people use successfully. I'm sharing the method I've used for the past thirty-five years in hopes you find some or all of it useful with your own babies.

I imprint on my foals as soon as I can. Having missed little Julie's birth, I imprinted on her after she was already up and nursing. That included particular attention to her face, ears, muzzle, and eyes. The next day, I put her halter on for the first time.

The traditional web-type halters are pretty useless on a newborn or young baby. The crown piece inevitably slides back onto the foal's neck. I hand-made the halter in the photo above out of leather in a figure-eight style with an adjustable nose and crown. The short lead strap is only a foot or so long. Since halters should NEVER be left on unattended foal, the strap is affixed permanently. It's short because you don't use it to actually lead the foal that young - you use it in conjunction with a butt rope. If the foal gets away from you, that short strap is a lifesaver; they won't be stepping on it, tripping, and perhaps breaking their fool necks.

The first time I expose them to the halter, I do nothing but put it on them and leave it for a few minutes. You certainly can do more and give them their first lesson, but over the years I've gotten a little bit less motivated about the first-day lesson. Julie was good about her first haltering, and after I took it off I petted her for a while and hung out with her to establish that I wasn't going to pester her. Then, other than daily handling (petting her just to continue that bonding), I didn't do any halter work (although I did put her fly bonnet on).

She's three weeks old now and getting strong and independent. It's time now to get serious about halter training. Today she had her first "official" lesson.  If you have an assistant, it'll help tremendously, but if not, you can still use this technique as long as you're able to safely catch and control the foal by yourself. I catch the foal with one arm around her neck and the other behind her rump and then wait until she settles before slipping the butt rope in place.


Using the fattest cotton lead rope you've got, make a figure-eight of the rope so half goes around the foal's rear as shown and the other half around the neck as shown. The "intersection" of the figure eight will be held in your hand. Snap the bullsnap around the rope itself where it intersects. This will be the part you hold with your strong hand. In essence, you've got a slip-loop on the hind end and an unfastened loop in the front.

Let the foal settle. You won't be using the halter much; you'll slowly transition to that. You're going to use the butt rope only to move the foal.  After the foal has calmed down from the placement of the rope, take a firm hold of the handle - that part of the rope intersection across the foal's back, as seen below - and give whatever verbal command you'll use throughout your training. I use a firm "Walk on" in conjunction with clucking.


The foal won't understand that command, of course, so as you give it, gently but firmly pull the foal forward with the pressure of the rope on the rear end. The front rope is there to stop the foal from getting away from you; it's the brake system, while the rump portion of the rope is the gas pedal. Timing is everything in horse training: as soon as the foal moves, immediately decrease the pressure on the gas pedal. Do a short 5 - 10 minute session only, continually just asking the foal to walk on, letting off the pressure as a reward, and then gently stopping her with your verbal, "Whoa," and pressure on the front portion of the rope.

Don't jerk the rope at any time.  Let your movements be slow and assured. If you have to let go of the butt rope, since the front portion is not fixed, the rope will safely just drop off the foal's rear end without harm.

Now, if the foal is reacting calmly - and for Julie's first lesson today, she was calm, engaged, and reasonable - you will introduce the first ever-so-light touch on the halter itself.  With the foal standing quietly, gently take hold of the short lead rope and gently draw it to one side. As soon as the foal gives to the pressure, release it. Your intention is not to lead the foal by the halter, nor to panic it. Foals instinctively react to pressure on the head by pulling way. That's okay!  You're going to teach the foal to give to that pressure. Take your time with it. Apply light pressure, wait until the foal gives, and then give back. Simple. Don't let your impatience get the best of you. All you want is a little bit of give. 

You can see I have another soft cotton rope dangling over my shoulder. That's the leg rope. On your first lesson, you can begin introducing the foal to picking up her leg on command. This is the safe way to do so - and it pays off in many other ways later one. 


Loop that soft leg rope gently around the foal's pastern. Never tie knots or make a noose!  Just bring one end around the leg, holding both ends in one hand, and ask the foal, "Pick up." Again, apply light pressure and lift the foal's leg. If the foal is a naturally kicky foal, you may not get this far; just let the rope touch her leg a few times until the kicking stops. If the foal is compliant, lift the leg gently a few times - using your verbal command each time - and gently lower it (don't drop it! Lower it politely. Polite handlers make polite horses.)  

One of many benefits of this method of teaching them to pick up their feet is it familiarizes them with having ropes around their legs. This can save a horse's life should they ever get hung up in barbed wire, as well as making it easier to hobble train them. It's also a safe method for the handler. If the foal gets kicky, you can let go of the rope without anyone getting kicked or tangled up.

That's it. Lesson one is done. 

Now, for the next few days (or weeks, or whatever is necessary / possible), repeat the lesson. Once the foal begins to understand the concept of giving to the pressure on the halter AND moving forward on verbal command, you will start to transition away from pressure on the butt rope. Don't be in a hurry. You'll find that butt rope is awfully handy training the foal to load, also. Take advantage of it while the foal is young and introduce them to walking over obstacles such as tarps, stall matts, and so forth.

The idea is to never get into a tug of war with that foal with the actual halter. A foal's head and neck are sensitive and easily injured. Do not voluntarily yank or pull on that precious head! Once the foal understands to move forward and trusts you not to frighten or injure them, you will teach them to associate the gentle pull on the halter to "walk on." If they act as if they're going to flip over or run backwards against the pressure, either your timing is off and you're not "giving" fast enough or you are advancing far too fast for the foal. Slow it down! Spending a lot of time with these early steps are well worth it and will make up for the investment later. As the old saying goes, "Make haste slowly."


With proper timing and patience, before too long your foal will be willingly moving forward with good impulsion, stopping with gentle pressure, and looking forward to each training session. 

When you've finished your session, slowly take off the halter. The process, as with all horse training, is more important than the goal. Fumble with the halter, pretending to unbuckle it, but don't do so. You don't want the foal learning to bolt after the halter is unsnapped, or - worse - to start running backwards with the halter dangling around the nose. Wait until the foal is completely settled to take that halter all the way off. And once it's off, just stand there, still holding the butt rope in place and confining the foal. Wait until she exhales before you slip the butt rope off. Once it's off, use the same technique and just stand there as long as the foal stands beside you. Let her slowly move away.

All photos in this post are from today's actual session with Julie, my new filly. This was her second time wearing the halter and the first time with a butt rope. Your results and actual mileage may vary. She's one of the more pragmatic, willing foals I've had, so don't be frustrated if your foal is a bit of an orangutan. Proceed slowly; never let the foal anger you; and do NOT expect it to know anything, even manners. That's why you're teaching them. This shouldn't involve any punitive measures at this point!  

Finally, one more word of caution. Halter breaking is often not linear. You'll encounter peaks and valleys. Just when you think that foal is completely halter trained, it'll likely regress and act as if it's never seen you or the halter before in its life. That's just a foal being a foal. Don't take it personally. Just start back to basics and keep those training sessions short and positive. That early bond you've formed with your foal is still there; it's just in hiding, and it'll return.

Good luck!  Leave a comment if you have a question.  

Copyright (c) 2018 by Marcy J. Miller * All rights reserved * No part of this content, including photographs, may be used without the express permission of the author * Links, however, may be freely shared * Thank you for linking, liking, tweeting, sharing, emailing, +1ing, and otherwise helping grow my audience * Most of all, thank you for stopping by!


Wednesday, April 18, 2018

The New Filly Arrives

After an unsuccessful attempt to sleep in the barn last night, I gave up and came in at 0200. The coyotes had been howling, Ethan the puppy was cold despite being curled up between my ankles, and every time Ethan growled at the yelping of the 'yotes, big-eared Mattie-K8 the Papillon - kept inside the house - heard him and barked in response. Chica was quiet and the stud horse, Ziggy, was keeping guard.

At 0530, Guitar Guy checked the barn as he left for work. I watched him drive off, meaning there was nothing going on,  and I drifted back to sleep. At 0720, I heard the distinctive sound of horses greeting a new arrival. I'd slept in my clothes; I had only to turn on the coffee and make my way down to the barn.


There, beside her mama, was a perfectly healthy, vigorous filly. She was already dry, walking well, and was nursing. She promptly passed her meconium - the first movement of hard fecal matter that had been in the bowel prior to birth - and came over to greet me with confident curiosity. 


Sandy War Chick "Chica" and new filly
(c) 2018 MJ Miller

Chica, the mare, had already passed the placenta (thankfully, it was in excellent condition and had no missing pieces) and had no apparent bruising, tearing, or other injury. She was ready for breakfast. It was a textbook delivery. Chica's a smart horse. Russ has been checking on her every morning at the same time for weeks; it wouldn't surprise me if she waited until he drove off and then promptly got to work at delivering her foal.

Any time I welcome a new foal, after I do the immediate obligatory routine - treating the umbilical stump, checking to make sure the placenta has been passed, and other tasks ensuring safety and health of mama and baby - I look for two things that always amuse me. I look at the foal's tiny hooves to see the "golden slippers" on the toes, soft protective coverings that nature provides to protect the uterus from damage from the baby's hooves. They are only there briefly before they fray and vanish as the baby walks. Then I look for the "milt." The milt is a gelatinous mass of sorts, rubbery in texture, that is in the baby's mouth until birth. I'm not always able to locate it; it's easily lost in straw or dirt. Today I found it, nestled in the straw in the foaling stall.


Now, granted, this may not seem exciting to those of you who turn ashen at the sight of raw biology in action, but for me, it has a certain earthy charm.  Back when, in my past life working with Arabians, I was told the Bedouins used to save the milt and dry it on the top of their tents for good luck. And in a nod to tradition, I'll do the same. Not that I'm counting on the extra good luck; I'm already lucky, with a healthy foal on the ground and a happy, proud mama horse beside her.

Ethan the McNab pup realizes he's no longer the baby in the family


And now it's time to brew another pot of coffee and head back down to the barn. These are the joyful moments - the great pleasures that make the hard work of horse keeping worthwhile.

(c) 2018 MJ Miller * All rights reserved * No portion of this content, including photographs, may be reproduced without permission of the author * Thanks for visiting!


Sunday, June 15, 2014

Rabicano and Roan: Two Unique Horse Color Patterns

Several years ago, my palomino mare, Hollywood Royal Lady (Holly), foaled a gorgeous bay stud colt who grew up to be my current stud horse, MJ Royal Smartypants (Ziggy). Ziggy was clearly a bay, but he had a unique "mealy" color -- meaning that he had subtle fawn coloring on the sides of his muzzle, along his ventral midline, and around his groin.  As his silky baby coat shed out and the mealy coloration dissipated, I could see distinct white hairs here and there.  They weren't in solid white patches, like a pinto, but were intermingled with the red of his bay coat, with some congregating together heavily.

Now, I've always loved roan horses and, never having had my name on a roan's papers, was hopeful Ziggy would magically mature into a bay roan.  Bay roans, for those who aren't up on roan genetics, are bay horses with a roan gene that is sole and separate from the base color of the horse.  Ziggy doesn't have that roan gene after all -- which a horse must inherit from one parent.  Instead, he has what is called a "rabicano" variation.

Rabicano!  What a great name.  It sounds wild and western.  It's a Spanish word that means "brush-tail." (How romantic is that?)  Rabicanos, as you might figure from that "brush-tail" translation, also have white hairs at the tail's base. They generally have white on the flanks and often on the barrel.  Ziggy's mother, who is a golden palomino, also has the rabicano trait; she has a couple of different good-sized areas where the white hairs predominate on her hip and neck.
Copyright © 2014 MJ Miller
Holly's dock area, showing rabicano as expressed in the palomino color.


The rabicano color trait is commonly known as "ticking."  Consider a blue-tick hound, or an Australian cattle dog; they're excellent examples of that ticking trait.  However, many people aren't aware of the rabicano variation and will misidentify a horse as being a roan or a grey when it lacks the genetics to be either roan or grey.

If you're unsure about whether your horse is a roan or a rabicano, here's the sure-fire way to tell:  a roan will always get darker where hair has been rubbed off.  For example, if the horse has worn a fly mask, they'll often have the darker burnish on the lower front of the face where the bottom of the mask has rubbed.  You may be familiar with roans that have dark lines or marks across their body.  Those areas show the original base color of the roan; scratch a roan, you get that base color back, and only that base color.  However, if you scratch a rabicano that has no roan genes, you get white hairs.  A rabicano will respond like a solid-color horse:  with white re-growth.
Note the white hair above Ziggy's tail as well as interspersed randomly throughout his rump hairs.

Copyright © 2014 MJ Miller
Close-up of typical rabicano white hair cluster.

Just about any color or color-patterned horse can be a rabicano.  Thanks to Holly's genes, here on the property we have rabicano in sorrel, palomino, and bay.  Each of them has very clear ticking and loosely-clustered hairs forming white patches.

Now, a few words about roans.  A roan has the same genetics of solid-color horses, but with the addition of a roan gene.  As mentioned above, that gene must come from one parent or the other -- even if the parent horse doesn't express the roan color, they still carry the roan gene.  A bay roan is said to be a bay that "expresses" the roan gene.  A bay horse can carry a roan gene but not pass it on to its foal, in which case the baby horse carries the gene but does not express it.  Confused yet?  Think about this:  a bay horse is genetically a black horse that has an agouti gene (making it a bay); a bay roan is a bay horse that expresses a roan gene.

A strawberry or red roan is a sorrel or chestnut, genetically, but it carries and expresses the roan gene.  A blue roan is a black horse that carries and expresses the roan gene -- but it does not have the agouti gene that would otherwise turn it into a bay horse.  Not all horses referred to as "blue roan" are true blue roans, though:  some are actually grullo horses with a roan gene.

Copyright © 2014 MJ Miller
Here's a bay roan bucking horse.

A buckskin can also express a roan gene, if it has one parent that carries that gene and if the other parent is a cream dilution.  (I won't get into the dilute genes in this post.)  You'll never see "buckskin roan" on AQHA papers, though; they're simply registered as "buckskin" with the possible addendum, "Carries and expresses the roan gene."

For the newcomer to the study of horse color, it's important to understand that color and pattern are two different concepts, and they're often misapplied.  Horses have a base color which is affected by genes for various patterns and effects, so to speak.  A horse may have the base color for black, but carry the pinto gene so that they have a color pattern of pinto.  Perhaps an easier example is an Appaloosa:  a black horse may have the genes that cause spots on the rump.  The color is black; the pattern, Appaloosa or spotted.  It can be confusing unless one keeps in mind that all horses have a base color plus the effects of various patterns.

Copyright © 2014 MJ Miller * All rights reserved * No part of this content may be reproduced without the express permission of the author * Links to this page, however, may be freely shared (and thank you for doing so) * Thank you for pinning, sharing, liking, linking, emailing, +1'ing and otherwise helping grow my readership.  Most of all, thank you for reading!


Tuesday, February 11, 2014

Horse Problems: If What You're Doing Isn't Working ...


Copyright © 2013 by MJ Miller
Over the years, I've had the honor of being asked to help a variety of people out with a variety of horses they were having problems with.  I preferred to do just that -- help the people with their horses, rather than working with a horse alone for a period of time and then returning it to the owner with the announcement, "He's fixed!"  When doing so, it often surprised me when I'd suggest a correction or a new way of doing things and the owner would hold their hands up defensively and say, "No, I always just do this when he does that!"  Pretty soon it became a standard refrain for me to reply, "And how's that been working out for ya?"

Here's what I'm going to rant about today:  when something isn't working for you, don't keep doing the same thing the same way and expect different results.  We all know that principle on a conscious level, but how many of us think about it and ask ourselves (with gut-wrenching honesty) if we're doing it with our horses? Instead,  we too-often continue to dig our heels in the dirt and repeat the same ineffective technique again and again, ad nauseum.

Consider, for example, the owner whose horse is sour about the trailer.  They have the battle down to a science:  they enlist the army of friends and neighbors every time they want to take sweet Princess for a drive.  Someone stands in the trailer holding a bucket of grain; someone else holds the rope through the escape door; another two people man the butt-rope; and the last person uses the whip and smacks sweet little Princess on the butt until she's a pissy, pin-eared basket case.  (I'm exaggerating to make the point, of course, but anyone who has dealt with owners of problem loaders will know where I'm coming from.)

By this time, someone like me enters the picture.  Owner tells me the horse won't load -- can I help?  And I happily say I can.  I show up, basket of magic in hand, and as soon as I start to explain the theory in retraining Princess, the owner holds one hand up, shakes her head and says, "No, I always just do this …"  Meanwhile, the horse has gotten worse every single time the Trailer Army has been involved. The horse is angry and getting angrier; the owner is at wit's end; and yet the owner steadfastly wants to continue doing things the same way.  If the owner doesn't change the way he or she does business, then where is change supposed to begin?  Is the horse supposed to spontaneously awaken one day and say, "Gee, I had a dream about just walking politely and confidently into the trailer.  I think I'll change the way I do it!"

This human tendency isn't limited to horse people.  I read the results of a study once in which it was found that the reason doctors often misdiagnose conditions is that they make an initial diagnosis and then interpret everything else from that point forward as being further evidence of that diagnosis.  They steadfastly clung to their initial diagnosis, disregarding everything contrary to it, and continued down the same path even if the treatment clearly wasn't working.

It's safe to assume you wouldn't like that as a patient.  Why would you want to do it to your horse?

Recently, I made the difficult decision to dismiss my shoer of five years in favor of having their shoes pulled and having a brilliant local hoof-trimmer try to get their feet back to the proper angles.  (If you've read my "Open Letter to My Future Horseshoer" post, you'll have some of my perspective on horseshoers.)  My shoer started out doing great things with my horses' hooves -- but suddenly they began to backslide.  Angles were bad; too much toe; crushed heels.  I had many candid (and sometimes contentious) discussions (arguments) with my shoer.  I'd point out that the horse's heels were getting worse every month; he'd always counter with an excuse:  "He has thrush," "He has white-line disease," "He won't grow heel," "His feet are too flaky to handle a change in angle," "You're not feeding hoof supplement," "You're not feeding the right kind of hoof supplement," and so forth.  Never was the problem with the angle of the trim, of course.  He continued putting wedges under the horse's heels and the horse's heels kept getting worse and worse.  It was heartbreaking.

Finally I ranted at him:  "If what you're doing isn't working, why are we still doing it?"  And I promptly called The Magician:  my new hoof trimmer.  It took me a while to  recognize that even though I was asking my horseshoer the right question, I was allowing the situation to continue:  we were doing the wrong thing the same way each time and expecting different results.

When I was a rookie patrol officer, I was introduced to a community-policing strategy called "SARA." Cops love acronyms -- and horse people don't them enough.  SARA stood for "Scan, Analyze, Respond, Assess."  Applied to horse situations, let's consider it "Watch," "Analyze," "Implement" "Evaluate" and "Refine." There:  we have our own acronym for solving horse problems:  WAIER.

If your horse is having an issue, watch and study that issue closely.  Whether it is the way they're traveling or the way they're changing leads, look at your horse.  Videotape if necessary.  Have others watch if you're the social type.  Whatever it takes, watch.

Now, analyze the situation.  What have you been doing?  Has it been working?  What's another approach that might work?  Try it.  Maybe just quit doing what you were doing before.  You switched bits and your horse tries to flip over every time you use the new bit?  Don't keep using the new bit -- at least until you've figured out what hurts your horse so much, or frightens him so irrationally, that he wants to flip over to avoid the contact.

Now implement the action (or removal of a previous action) in an effort to solve the problem.  If you're trying a different way of trimming his feet, do so now.  If you're trying a different training technique, get on it.  Do something different!  Your horse doesn't want to go through water and the many times you've spurred the ever-loving snot out of him and he still won't go through?  Try ponying him off an older, seasoned, water-loving tank of a horse.  Think outside the box.  Dare to be creative.

Now evaluate where your horse is with his issue.  If you've just trimmed his feet at a different angle, watch him walk again.  If you've tried a different technique of exposing him to the trailer, keep a notebook of his progress every time you work with him using that technique.  Here's the deal:  you should see improvement after a few sessions.  It may come slowly (as with fixing those under-run heels) or it may come dynamically (as with a horse who suddenly realizes the trailer isn't a scary bear-filled cave) but it should come. You should be going only in one direction with your horse:  the right direction.

I added a fifth dimension to this adaptation of the old SARA model:  refine.  After you've implemented the change and watched your horse's behavior again, and after you've assessed whether or not the change is helping, you must refine your approach.  Do you need to be more aggressive on correcting the angle of that hoof?  Or do you need to alter your trailer-training methods slightly?  Maybe you've been working on your horse's failure to collect properly and in doing so you've overworked him to the point he's sore and now he's stiff when you ask for collection.  Do you need to slow it down?

These are questions we should be asking ourselves to truly be an enlightened horseman.  And that good first question is:  Is what I'm doing working?

And if it isn't … why are you still doing it?

Copyright © 2014 by MJ Miller.  All rights reserved.  No part of this article, including photographs, may be reproduced without the express permission of the author.  If you are reading this somewhere other than on TheSaddleString.blogspot.com, you are reading stolen content.  Please notify me so I may take appropriate legal action.