Saturday, October 26, 2024

Cart Wreck!


As I move ungracefully and reluctantly toward my dotage and the years of being an "older rider," I've long realized gravity is not my friend; that the ground is harder now, and hay bales heavier; that I don't bounce particularly well, and that body parts don't heal with either the certainty or swiftness they once did. A while back, thinking ahead to the days when I can no longer hop on a horse or mule, I decided to do more harness work with my crew so that if I can't throw a foot in a stirrup, I can still throw my aging posterior onto a cart bench. Besides, I've always enjoyed harness horses and hitches and wagons and such. With all that in mind, I've been working Odelia the donkey in harness more, and a few months back got her a beautiful easy-entry Amish cart. 

Odelia's been doing so well, too. She's a happy donkey, very eager to please and compliant, and she is thrilled when she sees me coming with the halter. She's not energetic, and isn't leaning on the tugs in a hurry to move out. That's fine with me. I just want a solid, quiet, amiable little buddy to pull the new cart around the ranch. I've chronicled parts of her harness-career saga in previous blogposts here.

On Thursday afternoon, two days ago, I hitched her up and drove her off the property for the first time. Not far - just to the neighbor's driveway, where we were able to make a turnaround. I drove her back to the barn, did a lap around the barn area, and then headed back along the same route to do precisely the same thing. In the meantime, the curious chupacabras turned out in the pasture - two mares and a gelding - had made their way to the fence line along the driveway to see what was going on. As soon as we approached them I knew there was going to be drama. I stopped Odelia and let her stand for a minute so they could get a good look. Horses that are unaccustomed to horse-drawn vehicle use are typically pretty spooky of them, and I knew - despite the many laps around the barn area I've done in recent weeks with Odelia and the cart - that there was a good chance those three knuckleheads would spook and bolt. Odelia, though, has been a solid little donkey. 

As soon as I started her back into a walk, it was obvious there was going to be a train wreck. The three horses spun and bolted. Odelia, despite having her blinkers on, bolted along with them. She was headed directly for a scrubby mesquite. I overcorrected and pulled left. Odelia is a responsive donkey with a soft mouth, and she spun around to the left as fast as her little donkey legs would go. She went left, I went right - right over the top rail of the cart and hard onto the gravel road. My right hip hit first, followed promptly by right elbow and right side of my head, as my left hand extended out to try to break my fall. I slid on said hip, elbow and head until coming to rest. It wasn't a graceful Trea Turner slide. It was a hard, painful, gravity-really-sucks slide, and as soon as I stopped I was aware of poor, frightened Odelia bucking repeatedly and finally trotting face first into the field wire fence as I vainly hollered, "Whoa, now!" And then, just seconds after it all unfolded, she came to a stop and stood quietly at the wire fence.

I was hurt. I started to get shocky and fought it as I have on so many prior occasions: "Don't pass out. Don't pass out. Breathe!" And in what has become all-too routine I took inventory of my body parts: Right hip, agony. Right elbow, agony. Head, OWWW! I touched my elbow with my gravel-filled gloved hand and saw blood on my glove. I tried to stand; my hip tried to collapse. I made it to Odelia's side and just leaned across her back, talking to her and trying to beat the persistent shock from causing me to pass out.

It was obvious I wouldn't be able to walk the 1/4 mile to the house, so I crawled back into the cart and asked Odelia to please take care of me and safely get me to the barn. She did. She was once again quiet, willing, sweet Odelia, and we made it to the barn. The entire distance the world around me turned bright, radiant yellow - the shock again trying to force me to pass out, while I continued willing myself to proceed - and I could barely see through the bright yellow surroundings. At the barn, I was able to get out of the cart, unhitch Odelia from the cart, remove her harness, and put her away ... and then I faced the long, arduous trek to the house. At each step, my right hip collapsed underneath me. 

I took a more detailed inventory. Elbow clearly needed sutures and was bleeding as well as leaking a yellowish fluid ... synovial fluid, as it turned out. I could move it, but with great pain. Hip: so swollen the swelling was visible even with my jeans on, terribly painful especially with weight bearing, but good range of motion, but that weird collapsing feeling when I took a step. Knees: Both scraped and the right one puffy. Head: Road rash on my upper right side, bruise and a large swollen area and road rash on the upper forehead even past the hairline. It hurt to touch, hurt when I didn't touch, and hurt in the mandibular area when I opened my mouth.  Everything else, pretty darned good. 

I hurt too much to try to go to the ER 45 miles away, so I soaked in a bathtub full of epsom salts, cleaned and debrided the elbow wound the best I could and dressed it with triple antibiotic and silver sulfadene and wrapped it with padding, and afterward I sat with ice packs on various body parts. Due to my kidney disease, taking anything more than a Tylenol was verboten. Throughout the night I was a case study of abject misery, the elbow throbbing as well as stinging like I'd thrown salt on it. 

First thing the next morning, after having the husband person drive me to the barn so I could treat a mare's injured eye, I cleaned up and shampooed the gravel out of my hair and had him tote me to the Benson hospital. There, a very kind and thorough doctor expressed his concern about a possible hairline fracture to the hip, infection to the elbow laceration that it was now too late to suture, and the fact my ears felt filled up (it felt like I'd been at higher elevation). By then, there was a line directly across my torso right below my breasts that was tight and tender. Multiple X-rays and CT scans, and a solid exam later, he gave me the amazing news that I hadn't broken anything. The hip: ligament and soft tissue damage galore, and a likely deep bruise / blood pocket. The elbow: Bruising, ligament damage, and that darned synovial fluid leak. The head: Hard enough to resist any injury beyond road rash and a good knot. As the doctor put it, I dodged a big one. 

So here I am, enjoying the irony that I pursue an equine activity intended to be a safe alternative to riding, only to be laid up for a while after all. The fact harness work is intrinsically dangerous is not new to me; I've spent thousands of hours reading through old papers and death records while researching for my western history books, and have read countless accounts of "local man killed in wagon wreck" or "child killed in buggy accident." The incident confirms my awareness of how hard the ground is, and how unfriendly gravity is. Horse-drawn vehicles are far more dangerous than the horseless carriage; there are no seat belts, or windows to keep you from being ejected, or airbags. The horsepower behind them is subject to flights of fear or fancy that can easily lead to runaway situations, and unlike being in the saddle, gripping with your knees and clenched buttocks isn't going to keep you from flying. 

The scene of the crime. You can see the tree we were headed to at right, alongside yaw marks and scalp scuff.

Odelia, by the way, is just fine, and to my relief has no injuries at all. My beautiful new cart is also, from what I could tell through my shocky eyes yesterday, also intact. I expect my hip will give me problems for some time, although I'm walking a bit better today and was able to drive to town to pick up the muscle relaxant the doctor prescribed. With its help maybe I'll get a bit more sleep tonight rather than waking up at 0300 with pain in the elbow. By the way - that elbow now matches the other one, which required six stitches when a horse fell with me on pavement many years ago.

Life isn't without risk, and I expect in a few weeks to be driving Odelia around again. All of us in the horse world know it's not if  but when and how many times an injury will occur. We make choices as to how much risk we'll take, and how much safety we will prioritize, but there's no way to make certain activities entirely safe, just to make them degrees of safer. I've had the thrilling joys of hang gliding, pursuit driving, twenty years of police work, distance cycling, backpacking alone, and a lifetime with horses. I've endured a lot of injuries along the way - but that adrenaline is addictive stuff, and horses more addictive still. So foolhardy as it may be, I will continue to enjoy my horses (between injuries, of course). It is my decision.

The deep scraping is where my hand or elbow slid along the ground. It doesn't show in the photo but there was a distinct, pathetic hand print in the gravel. Good thing I had gloves one!

A knot on the forehead and above the brow and some scalp scuff, but otherwise intact!

Yes, the elbow could've used a couple of stitches.

So no cautionary tales or morals here: Just be aware that you can be injured (badly) in a horse-drawn buggy as easily as in the saddle, and make your own decisions accordingly whether that be wearing a helmet, a protective vest, or other safety gear. For me, it means I'll probably invest in some good skateboard protective gear for my elbows and perhaps my knees. I don't know if there's much I can do to protect my hips. 

Time to curl up in the recliner with a heat pack. Be safe out there!

Wednesday, October 9, 2024

How to REALLY Draw a Donkey


Friends, it's time for a courageous conversation about abusive donkey drawing. No, not donkeys drawing cruelly heavy loads, but badly drawn donkeys and - gasp! - tutorials on how to badly draw a donkey. My recent online search clearly indicates there is a lot of interest in donkey drawing techniques. Unfortunately, the tutorials largely appear to be done by people who have never actually seen a donkey. Much like the early artists who drew fantastically weird New World animals, these samples of artistic splendor are chimeras of sorts: Goat-headed donkeys, and horse-necked donkeys, and donkeys with such weird proportions and oddly-placed features that even Picasso would be pained to see them.         

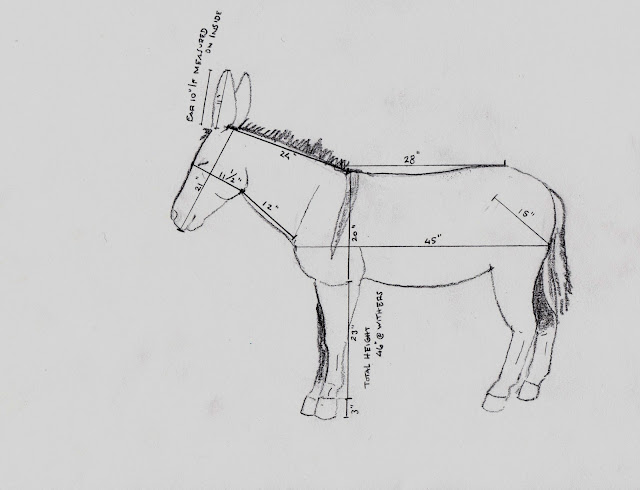
So here I am, not as an accomplished artist, but as a donkey owner who wants you, dear reader, to know the characteristics that distinguish a donkey from, say, a horse or a mule or a goat - what gives a donkey its donkeyness. With a little help from Odelia, my donkey-in-residence, I shall offer my best anatomical advice on donkey creation. I've patiently measured my very patient Odelia to provide actual proportions as a reference (see diagrams towards the end) so that you may have a quick reference for your future donkey creations. Using photo references is all well and good, but relying solely on those references won't give you a reliable sense of donkey perspective.

Donkeys aren't just horses with long ears. They aren't mules, either. Oh, what a dagger to my equine-loving heart to see writers and captioners of photographs and artists labeling something as a "donkey" when it is clearly a mule, and vice versa. Let's look at the differences.

Although there are several varieties and flavors of donkeys, ranging from adorable spotted Sicilian donkeys to mammoth jacks and onagers and woolly Poitou donkeys, I'll focus on the humble desert burro that is doubtless familiar to anyone who has read Brighty of the Grand Canyon or watched Treasure of the Sierra Madre or visited iconic Oatman, Arizona. Although the shade of their color varies, their basic shape and coat pattern is largely the same. Their most recognizable coat color is a basic grey. Odelia, our lovable Lady of the Bray here at Rancho Chupacabra, is all that: an adopted BLM donkey in the typical grey color. Donkeys also have what's called a "mealy" pattern: They're lighter on the underside of the belly and groin than they are above it. Note that they have thicker, coarser coats during the winter, and slicker, finer coats during the summer. 

Let's start at the head. Everyone knows donkeys have long ears! But donkeys don't have pointy ears like Arabians, folks. The tops of their ears are somewhat rounded. Quit drawing pointy-eared donkeys! The ears of a desert burro are rimmed with black. Their heads are generally shorter and heavier than a horse's or mule's. They don't have pointy little noses, either. I've seen a lot of artists drawing petite-nosed donkeys and you have to study the picture for a bit to realize it isn't intended to be a goat. Donkeys - in general - don't have dished faces, either, but rather straight, pragmatic-looking faces. If they do have a dish, it's going to be subtle, not concave Arabian profiles.

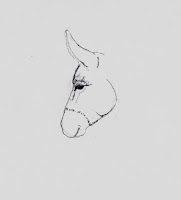
Donkeys have pronounced brow lines above the eyes, and generally there's adorable floof that drifts off the top of those ridges. Their eyes are set at a different angle from a horse, as well. And those eyes, which generally have either a mischievous twinkle or an Eeyore-esque woebegone pout, are surrounded by a markedly lighter shade than the rest of their face. Similarly, there's a distinct delineation between the top part of their face with its coarse, longer hair and the muzzle, which has a smoother, velvety texture.  Their nostrils are different from a horse's, as well, with a pronounced nasal ridge above the nostril. Don't forget to shade the area. Their mouths are generally shallow. Although they do sometimes have a bit of a star on the forehead - one of my donkey exes, Olivia, had that feature - it's not prevalent. However, there's a distinctive star-shaped whorl of hair on their forehead generally set just below the eyes.

Moving on to their neck: They don't have graceful, long, arched necks. Neither are they hamsters; they DO have necks, people. But the crest of the neck - that top line - is pretty darned straightish (and sometimes, in over-fed donkeys with "fat pads," the neck is concave or "crestfallen). And on top of that straightish neck is a short, erect mane. It doesn't grow like a horse's and flop over; it stands up in a scruffy mass like a zebra's. It's generally darker than the rest of the donkey. On your typical grey desert burro, it is a shade of sunburned black or burnt umber. The crest of the neck, from base of ear to withers, is twice as long as the underline of the neck, from jowels to chest.

The neck-bone is attached to the shoulder-bone, and that shoulder is straighter and shorter than a horse's. The withers - that arched protrusion between neck and back - is quite flat on a donkey, compared to a horse, and on burros, there's a dark linear marking that extends from the withers downward. In Christian lore, that line is said to be a cross bestowed upon the donkey for carrying Mary as she was seeking shelter just before the birth of Jesus. Why is it called a cross? Because it intersects their dorsal stripe, which extends from the top of the head down the center of the donkey all the way back to the end of the tail. You can see it in the photo of the donkey's tail, below. 

Donkey backs are fairly flat and proportionately longer than a horse's in comparison to front end and rumps. And the rumps? They aren't round and apple-butted and luscious examples of big booty. (Big ass ass? Don't get me started.) They're angular, narrow from the rear, and they slope downward in a flat line. And on the back end of them, there's a tail that is NOT a luxurious mass of long tail hair. They are scruffy tails with about as many bristles as an old man's ear until you get to the meager collection of slightly longer hair at the end. Don't draw a yak tail on your donkey! Donkey tails look like this. 


Moving down the donkey legs, now, note that your standard grey desert burro doesn't have white socks. They don't even have rear chestnuts. They don't have graceful long legs, but they reach the ground. And where they contact the ground are hooves that are more upright than a typical horse. The pasterns are not as sloped as a horse's, either. Don't put goat hooves on your donkeys, either. They aren't cloven, although sometimes donkeys will act like the devil.

Proportions

Just as in drawing people, knowing general or average proportions can be useful in evoking realism. Individuals obviously have variations in proportions; that's what make us unique. Knowing proportions can help you know what makes an animal look younger, or older, too. In the descriptions below I've tried to either avoid, or to explain, specific terminology on the parts of the equine to make it more accessible to non-horsey-people.


Head and Face:

From the front: The ears, as the most distinctive feature, are a useful point of reference. The ear is roughly 10% longer than the widest point of the face, which is just above the eyes. The ears are roughly half the length of the face. The widest point of the face is just slightly under half the length of the face. If you start with a kite-shaped diagram, as many of us were taught to draw horses long ago, the distance from the base of the ear extending diagonally to the top of the opposite eye is somewhat longer than half of the distance from the base of the ear to the top of the opposite nostril; the base of ear to top of opposite eye is just shy of the length of the ear. 

The top of the donkey's eye is 1/3 of the way down the length of the head (from poll to lips). The ears are roughly 1/2 the length of the head. 

From the side: The widest part of the face, just below the eyes and extending from the front of the face to the jowels where they meet the neck, is just over half the length of the long part of the head, from behind the ears to the tip of the muzzle.

The ears, if measured from the side, are slightly longer than they are if measured from the inside. In other words, if you're measuring the ears at the center of the head, they're shorter than if you measured them from the side of the head.


Neck: The topline of the neck - the crest, or silhouette of it at top - is TWICE as long as the bottom line of the neck. This means that from the side, the entire length from where the neck meets the chest to the front of the face is just about the same length as the distance from the top of the neck from behind the ears to the withers. The neck where it joins the head is shorter from top to bottom than the neck where it joins the chest. 

Withers: The donkey's "cross" or dark shoulder stripe is at the withers. The shoulder itself is straighter than the horse's shoulder; the ideal horse has a 45 degree slope to the shoulders, while the donkey is not as sloped.

Back: The back is longer from withers to the high point of the rump than the neck is from ears to withers. Compared to horses, donkeys are long backed. 

Body: Visualize a line from the bottom of the muscle that's just above the front leg to the withers. This length is shorter than the distance from the hoof line to that same muscle. In other words, the legs are longer than the body mass from leg to withers. From the front of the chest (where it meets the neck) in a straight line to the rump, parallel to the ground, is a distance that's almost the same length as the total height of the donkey from ground to withers. They're long-bodied animals.


Let's Draw our Burro!

Okay, let's do a quick step-by-step!

Here's a fairly straightforward reference photo of Odelia. For this quick exercise, let's just do the head and neck. Make corrections as you go along to keep the proportions right. Remember to utilize negative space to see the lines and angles more accurately (focus on, for example, the shape formed outside the donkey, such as the slightly rounded area where the underside of the head meets the underside of the neck.) Pro-tip: You don't need to include extraneous objects, like halters, fence posts, and other items in the original photographs you use. Pet peeve: People who take a cute photo of a donkey sticking its head partly through two slats of wood, and draw it with the wood obscuring its cute little head. The joy of drawing is YOU can interpret what you're portraying. 


1. Draw your donkey's face and ears, remembering the proportions above. Use the ear length as a guide for the proportions to follow.


2. Draw in the muzzle and jowels (jaws).


3. Draw the eyes and accent the browline. 


4. Draw the delineation between the muzzle and the upper part of the face.


5. Add the nostril, remembering the deep shadowing around the side and lower end of it.


6. Fluff up the ears and draw in the dark border that extends around most of each ear.


7. Draw the underline where the head connects to the neck; draw the upper line of the neck, keeping it straight.


8. Add the upright, scruffy mane and forelock. Shade your drawing appropriately, going in the direction of the coat. Congratulations! You've done a donkey portrait.


Note: From this point forward are instructions on drawing the rest of the donkey.

9. Draw in the shoulder and the flat, low withers. Shade in the vertical cross at the withers.

10. Draw the back. Keep it fairly straight.

11. Draw the front legs. Remember: Donkeys have joints! The bone above the knee is longer than the bone below the knee (the cannon bone). At the bottom of the cannon bone is another joint, called the fetlock. Below the fetlock is a slightly angled distance connecting it to the hoof; this angled section is the pastern.

12. Draw the underbelly. It is longer than the length of the back.

13. Draw the hind legs. They, too, have joints. The hock is the large joint above the cannon bone and bends in the opposite direction from the front knees. Below the cannon is the fetlock, just as in the front legs, and below the fetlock is the pastern that attaches to the hoof.

14. Draw the scrawny rump. Don't forget to shade the point of the hip.

15. Draw the scrawny, scruffy excuse of a tail.

Voila! A whole donkey. Now add your shading to indicate the hair, making sure you go with the flow of the coat. 

Supplies

For the purpose of the illustrations included here, I used a Koh-I-Noor Hardtmuth Progresso 6B woodless graphite pencil. I love these pencils! You can buy them here. Note: This is an affiliate link, meaning I may earn commissions from purchases made through this link (and for which I thank you tremendously for helping keep the donkeys in oats.) 

I also used a plastic eraser - in pastel, of course, because who can resist pretty erasers? You can buy them here (affiliate link). 

Now, go forth and create your own donkeys! If you'd like a mule tutorial, leave a comment. Also see this post for further info on drawing equines: What Horsemen Want Artists to Know

Copyright (c) 2024 Marcy J. Miller * All rights reserved * No part of this content may be reproduced without the express permission of the author * Thank you for stopping by!


Monday, August 19, 2024

Odelia's First Day Hitched to the Cart

 It's a big day here at Rancho Chupacabra, folks. After being laid up for a week with the joy that is kidney stones, I braved the blue skies and wonderfully mild mid-90s weather for another training session with Odelia. On her previous session, I fit her new harness to her and lowered the shafts of the cart into the tug loops, but did not attach the tugs to the singletree; I just oriented her to the lowering of the shafts, and the weight of them on her harness.


Today, I ground-drove her for a few minutes and then went straight to the cart. I lowered the shafts and she was perfectly at ease, so onward! I went ahead and hitched her up, and then began to lead her (using a halter over the bridle) with the cart in tow. She was outstanding, as I expected from such a willing, sweet-natured little donkey. 

Progress was, however, slow. She was hesitant, and I was challenged at leading her, holding the lines, and walking at the same time. Fortunately, the husband-person magically appeared at the perfect time and assisted by holding the lines while I led her. He then (very trustingly, I must note) hopped into the cart, took the lines and whip, and I led Odelia while he drove her. We then swapped places and he held the rope very loosely while I drove her, and after she'd proven herself capable and happy, he removed the lead rope. Odelia was just excellent. Not a lot of finesse, yet, but she is brave and shows no resistance or fear at all. 


On our next session, kidney stones and other factors permitting, I hope to move her outside of the confines of the round pen and to an open, flat area. I plan on hitching her, leading her to that site, and then hopping into the cart if she is at ease. Donkeys are truly incredible little worker bees, and I'm tickled at how happy Odelia is when she sees me coming with the halter. It's hard to believe this was the shy, adolescent BLM burro she once was. 

Copyright (c) 2024 by Marcy J. Miller * All rights reserved * No part of this content, including photographs, may be used without the express permission of the author * Thank you for stopping by!


Sunday, August 11, 2024

Harness Training Odelia the Donkey


Odelia in her custom pulling / work collar

Quite some time ago, I began training Odelia, my BLM burro, to harness. Despite not having any wheeled horse-drawn vehicles at hand, I nonetheless began training in the usual manner: bitting and ground driving. I then ordered a custom collar and hames for her along with a work singletree. Donkeys require a different fit to collars and hames than horses or ponies, and it's critical to properly measure and order the right fit for their safety and comfort. Once Odelia's collar set arrived, I began driving her in full harness, letting her learn resistance by initially putting my own pressure on the traces using a string to pull back, then adding the singletree, and finally letting her drag a tire. She was an absolute ace throughout all of the training and, consistent with her happy, willing nature, never showed the least resistance.

I worked her in the poles (meaning, a PVC pipe to simulate the shaft of a cart) as well, so she could become accustomed to a shaft-like object pushing against her side. Doing such work also helps the driver by familiarizing them with the turning radius, the need to keep distance from obstacles that might catch upon the ends of the "shafts," and the like. Once she was coming along well, I was ready to add a wheeled vehicle. Unfortunately, I didn't have the money to get a proper cart right away. I wasn't pleased with the more affordable options on Amazon. I did my research on carriage shops, picked one out, and went into a  holding pattern. Last month, though, my other half was making a sudden road trip to Pennsylvania. Aha! Opportunity! The savings on shipping enticed me to act. I asked him if he'd be willing to pick up a cart from the heart of Amish country, and he agreed to do so. With just days to arrange it, I ordered a beautiful wooden cart from the good folks at Pequea Carriage Shop, put down a deposit, and sent him along his way with directions to Narvon, Pennsylvania. I was just about giddy with anticipation.

I followed along the journey by phone and email as eagerly as a child follows Santa's path on the NASA site on Christmas Eve. R. gave me updates: "I picked up your thing." "I'm backed into the parking space at the motel so I am only a few feet from your thing." "Your thing is still fine!" And on one glorious morning, R. and My Thing arrived ... and it is a Thing of Beauty.


The cart is an easy-entry cart from Pequea, in the proper size for both Odelia and my sweet pony, Gracie, with upgraded puncture-proof tires because just about everything out here is stabby as hell. Here's a link to  Pequea Carriage Shop. Melvin Beiler is a pleasure to do business with, and I'm just thrilled with the cart.

Now, Odelia has her beautiful collar, but collars aren't as comfortable for light loads with a higher line of draft as a breast-collar style harness is. In addition, the breast-collar harness that would fit Odelia would also fit Gracie the pony, whereas Gracie can't use the same collar. I opted to order a harness from Chimacum Tack (where I'd previously purchased Odelia's collar, hames, and singletree). I chose Chimacum's Pleasure Harness for Donkeys, Ponies, and Mules. Mindy at Chimacum is terrific to work with and, given proper measurements, always ensures that harnesses fit your animal and the job you'll be doing with it. Here's a link for Chimacum Tack. Note that Chimacum does not carry leather harnesses. As a die-hard leather traditionalist and leather-crafter, I must admit the Biothane / Brahma Web harnesses are just outstanding. They're durable, easy to clean, and have several benefits over leather. I can't believe I said that, but there you are.

My beautiful new harness arrived a week ago. Thanks to medical appointments, monsoon storms, and trips to the veterinarian, it wasn't until yesterday I was finally able to get out there and introduce Odelia to it. This pleasure harness is a complete set, including everything from half-cheek snaffle driving bit to overcheck, traces, breeching, and crupper. Best of all, it is entirely custom and fit for the unique proportions of a donkey. I chose Royal Blue for the padded breast collar and saddle.


Yesterday's session was lengthier than is ideal in training, but it included fitting the harness to Odelia (the initial fitting takes quite a while - there are a lot of buckles and Conways to attend to!) Please note that I snapped these pictures throughout the process and they are in no way a depiction of proper fit. I was also careful to trim the whiskers beneath Odelia's eyes to avoid the irritation of her blinkers continually bumping them.  Odelia was perfectly happy being fitted, soaking up the attention, and stood like a champ despite the temptation of having green weeds nearby.

After fitting the harness, we proceeded through the initial phases of harness training to re-orient Odelia. She has been a lady of leisure for a few months so I need to assess her attitude and emotional state at each step of the way. I harnessed her, then walked her in the round pen for a while before moving to ground-driving. (She's so well-behaved it's hard to take things in small increments, but I am forcing myself.) I had already brought the cart into the round pen and stood it up (shafts upward) in a safe position so she could see it and become visually accustomed to it. After some ground-driving, I attached a piece of baling twine to the traces and applied pressure to them as I ground-drove. She was fine with this slight resistance, so I attached a small (ATV) tire she could drag. She was perfectly happy. Onto the poles! It was as if we'd just been working in them last week. She aced it. Sweet, willing Odelia. 


Please note that while ground-driving - or, for that matter, even when actually pulling a cart - at this stage of training, you do NOT want your draft animal to know how to back up in harness. Actively discourage it! This is all new to them and should they be frightened or resistant at any part of training or external activity, they may back up to try to avoid the pressure of pulling and they will quickly learn a very, very bad habit. Work them in a forward-only direction for at least a couple of months before you add the reverse gear. They need to learn to pull, not evade. (This is also one reason I prefer to teach them to use a pulling collar and to drag items - a sledge or tire won't easily roll backward! Instead, they get consistent work in pulling weight against a collar.)

Odelia with PVC training poles attached through the shaft loops. Please note that I have not used shaft wraps on the poles, nor are they necessary for this exercise. The holdback strap is not attached, either; it is looped and tucked into the back strap to keep it out of the way.

After refreshing Odelia's memory in the poles, I removed them and led her up to the new cart several times and walked her around it. She is a brave little donkey and unphased by it. I had already pulled the cart around in her presence so she could hear and see it in motion. I then positioned her in front of it and slowly lowered the shafts onto either side of her. I did not hitch her to it but repeated the lowering and raising of the shafts a few times. I then inserted the shafts into the shaft loops very briefly, but did not attach the traces to the singletree. She wore her blinkers throughout. (This is an essential safety element.)

After that brief, positive, initial introduction to the cart, I quit for the day. We'd covered a lot of ground. I ground-drove Odelia back to her stall and into it, and only then removed her bridle and switched to the halter.

I'd hoped to do further today, but although Odelia is up to it, I managed to get upper back spasms from yesterday's effort. Gah! I am pretty much laid up today. When I have recovered and made further progress with Odelia, I will make an effort to post updates. 

For further reading: 

I highly, highly recommend this book on harness and hitch by Marlen Steward and the late Steve Bowers. (This is an affiliate link and I may receive commissions on your purchase - for which I thank you for the support!) Driving Horses: How to Harness, Align, and Hitch Your Horse for Work or Play. I just can't rave about this book enough; it covers harness types, line of draft, driving techniques for teams, trouble-shooting, harness storage, and so much more, and all of it with top-drawer photographs and easily understandable instructions. I bought this book when I was briefly driving a two-in-hand stagecoach in Tombstone and it helped me tremendously with heavy-harness and team harness elements. Driving and harnessing (particularly team driving) is far more technical than today's typical horseman might recognize; this book is a bible for the modern teamster. It focuses more on harness and hitch than on actual driving and training of stock, though - for a great all-around guide to basic harness training, you'll want this book by Doris Ganton (another affiliate link): Breaking & Training the Driving Horse. It's an easy-to-understand, well-illustrated guide to starting your driving horse, and includes the "how-to" goods on ground-driving, making and using poles, accustoming your horse to cart and buggy, and onward. I've relied on it for many years and still dust it off to refresh my memory every time I start a horse between lines.

Questions or comments?  I am experiencing technical issues in promptly seeing / replying to comments (probably operator error, but anyway!) but I welcome you to leave them. If you need to reach me directly, please email me through my website Marcy's Website. While you're at it, please check out my donkey and equine art! Here's a sample: Olivia Painting.

Copyright (c) 2024 by Marcy J. Miller * All rights reserved * No part of this content, including photographs, may be reproduced without the written permission of the author * Links to this page may be freely shared, and thank you for doing so! * Most of all, thank you for stopping by.

Wednesday, March 6, 2024

Horses and Donkeys and Mules and More


My molly mule, Delta Dawn


If you don't occupy the world where a "frog" is found in a horse's hoof or "brain surgery" means castration of a male horse, you might not know the ins and outs of horse hybrid terminology. Most people know a mule is a cross between a horse and a donkey, but it's not exactly that simple. Let's dive into the lexicon of horse hybridization.

The humble, utilitarian donkey goes by a few different names. There's the humble burro, a donkey with a Spanish accent: small, tough little critters brought to North America as beasts of burden for prospectors. The burro is the long-eared equine that runs feral in many parts of the southwestern US. 


My sweet burro, Odelia. Note the white markings on the side of her neck. This is her BLM freeze brand, identifying her as having been adopted from feral BLM herds.

There are other types of donkeys. There are onagers, the wild asses of Asia (aka the Asiatic ass); mammoth jacks, which are large donkeys often used as bloodstock for mule-production or as riding donkeys; Sicilian donkeys from Italy, also known as miniature donkeys; the Baudet du Poitou, which is a fancy-sounding name for a type of donkey with a distinctive long coat; Corsican donkeys; and plenty of other donkeys, each with their own unique history and type. Donkeys are all equines, but they aren't horses. They have long ears, short manes, fairly straight backs, distinctive angles to their shoulders and hips, and tails that can't decide if they're long haired or short. 

A female donkey is referred to as a "jenny" and a male donkey is a "jack," (hence the name "jackass.") Now, if you take a jenny donkey and cross her with a male horse (stallion), do you get a mule? Nope. You get a hinny. It's a horse-donkey hybrid, and has plenty of the benefits of hybrid vigor, but it's not a mule, and in many ways it differs from a mule physically. A hinny is smaller than the mule equivalent would be, and sports the limbs and head of a horse and the body and torso of a donkey. It still has long ears and a generally mule-like appearance, but an experienced mulero will be able to tell the difference. 

Take a jackass, though, and cross him with a female horse (mare), and you'll get a mule. Its head and legs will look more donkey-like, but its body will favor the horse. Mules are generally preferred to hinnies, and are much more common (not only because of that preference, but because breeding a larger and more - ahem! - well-endowed stallion to a small jenny is not without risk to the jenny). Mules and hinnies, being hybrids, are rarely fertile, and (officially, at least) there have been documented (but exceedingly rare) cases of female mules producing foals but not of male mules fathering any. (This all doesn't preclude mules and hinnies from having the parts AND the inclination to breed unless neutered, but it does prevent them from being successful.)

Now, your female mule (and hinny, too) is referred to as a molly mule, and the male mule / hinny is a john mule. 


Jasper, of uncertain parentage. Although sold to me as a mule, based on his full mane and tail, the clean lines of his legs, his short neck and his facial features, I suspect him to be a hinny. Either way, Jasper's a john.


Often I’ll run across historical photos depicting mules that are mis-captioned as donkeys or burros, and similarly, uninformed writers will too often refer to mules as donkeys. If you are writing about one or the other, it behooves you (yes, I did that on purpose) to know the difference. For the record, the Democrat mascot is the donkey, not a mule, and sloppy PR and marketing people get the images confused. 

In addition to mules and hinnies, horses can be crossed with zebras to produce get called "zorses." Although they are interesting looking and tough, and *sometimes* trainable, they're often dangerous and challenging even for the most experienced mule trainer. They don't have the benefit of fully-domesticated parentage on both sides. If they are the product of a female horse and a male zebra, they will have the advantage of being raised by a domestic mother, who will pass on much of her general attitude about humans to the foal, whereas a zebra mother will pass on her own wild inclinations to the baby. 

A zebra can also be bred to a donkey, and the resulting foal will be - you guessed it - a zonkey. Calmer and more pragmatic than a zorse, they can still be a handful. Zebras themselves are notoriously cantankerous souls, even if raised in captivity, and if not handled consistently and regularly they can revert back to wild very easily. This time last year, tragically, a zebra in Ohio bit its owner's arm nearly completely off. They're quick to bite and quick to kick, and savage when they do either. Remember - these are the creatures that fight off lions and hyenas and other predators in their native lands. 


For comparison's sake, here's Julie, a horse. Compare ear length, tail, angle of hip and shoulder, brow prominence, legs, neck length, and arch of the crest. 


So there you have it: mollies and johns and hinnies and jennies and jacks and mules and more. 

Copyright (c) 2024 by Marcy J. Miller * All rights reserved * No part of this content, including photographs, may be copied or published without the express written permission of the author * Links to this page, however, may be freely shared * Thank you for linking, liking, sharing, emailing, and otherwise helping grow my readership, and most of all, thanks for stopping by!

Sunday, March 3, 2024

What Horsemen Want Artists to Know About Horses


"Draw me like one of your French mules"


Since primitive men first scratched on the walls of caves, they’ve been inspired to draw and paint horses. These beautiful, spirited, useful beasts have occupied our creative inclinations ever since. Whether rendered in ink, paint, charcoal, marble, or wood, they graze in pastoral scenes, carry cowboys across western canvases, and ignite the dreams of little girls in children’s books. Walk into a “decorator outlet” and you’re sure to see huge paintings of horses, or just parts of them. Some are lovely. Some are perfectly appropriate for hanging on the wall behind the sofa. Some are downright scary.


Now, perhaps more than ever in the history of man-painting-horses, a lot of the artists producing horses have spent little time around them. The average urbanite might not notice the cowboy on a horse without a cinch to hold the saddle in place, or with a shanked bit and no curb strap, but your average horse person will immediately zone in on that little detail and be either amused, aghast, or annoyed. Some of us even take pictures of the offending piece and share them with our fellow horsey friends. I’m here to help you avoid being the target of our mockery.


Creative license is all well and good, but authenticity matters. Paint your horse blue and fuchsia, that’s creative license. Paint your horse with exaggerated features and ridiculously long manes and tails, and you’re the typical Arabian horse artist. Paint them blue, give them human eyes, and remove their leg joints and give them bodacious blue horse booty, and you might be Marc Chagall. But try to paint a realistic horse and put its eye on the front of its face, or give it a too-short back and too-long legs and a neck the length of a hamster’s, and you’re going to be in the “Point and Laugh” school of painting.


So, speaking here as a lifelong horsewoman, I want to share a few tips with you, my tenderfoot artist friends, that may help you out. Although I do dabble in watercolor and pencil, I’m neither a trained artist nor an art teacher; however, I’m confident in my knowledge of things horsey, and I share this in hopes it will be useful information to other dabblers. 


Study great horse illustrators. Some of my favorite artists as a child were breathtakingly skillful - and wonderfully authentic - illustrators. Take a look at the work of Wesley Dennis, Sam Savitt, Robert Lougheed. All of them illustrated books by Marguerite Henry, that gifted and versatile writer whose horse books so many of us grew up on. The illustrations were reliably correct in their depiction of horses, ponies, and donkeys. Another illustrator I loved, Ross Santee, is of an entirely different type. His pen and ink work was minimalistic, sparse, and yet so perfectly captured the horse or, perhaps more often, Indian pony - and he knew, and could convey, the difference. For detailed, exquisitely rendered authenticity, look at the simplest sketches or the most elaborate paintings of Frederic Remington. Arguably, no one can compete with his ability to capture type and form-to-function of the western horse. Look at the horses done by Olaf Wieghorst, Charles M. Russell, and Charlie Dye. I look back happily at my childhood memories of the thrill of seeing those perfectly-painted western horses. Wieghorst was, for a time, a mounted police officer (as I was) and his horses were among the most expressive of the western artists. 


Choose an appealing angle. My mother was an artist, though not a horsewoman, and in the few paintings she did with horses present, she handled them capably. One thing she told me when I was a child was “Horses aren’t attractive when painted directly head-on.” There are, of course, many exceptions, but overall it has proven true: it’s particularly difficult to attractively render a horse facing directly at the viewer. Tilt the head slightly, and you’ll get a much more attractive angle. Compositionally, they’re much more attractive from the side or at an angle. Challenge yourself, of course, but choose a pose that is attractive. 


Know the importance of Eadward Muybridge. Muybridge, a 19th century photographer, changed the way horses were portrayed in art. Look at early - say, revolutionary-era paintings of horses on the battlefield, and British sporting prints of horses and hounds - and you’ll see a couple of dominant poses. You’ll soon recognize the traditional galloping horse with front legs sprawling forward and rear legs sprawling just as far to the rear, or combat scenes with the hero on a horse that is balanced on one hind leg with both forelegs extended grandly above the battlefield. Horses don’t move that way. Muybridge was the first to debunk, as it were, the old myths of horse motion. In 1878 he completed a series of photographs of a racehorse in motion. The publication of those images was controversial; people were shocked to see that horses didn’t move as they’d always believed they did. For the first time, people understood gait and equine locomotion. Equestrian art would never be the same.


The impossibly leggy, impossibly posed, ubiquitous horse from British hunt scenes prior to Muybridge.


Know basic horse conformation. When horsemen assess horses, they look at the way the horse is put together. It’s an art and a skill. They develop an eye for good, straight legs that won’t break down under stress. They look at the height of the withers, and the angle of the shoulder, and the angle of the hip. All these things, and so many more, comprise conformation. If I could offer one helpful concept to the burgeoning equine artist, it’d be the concept of the trapezoid. Performance horsemen know the best horses have a good trapezoid: a long underline (the line between front and hind legs); a shorter top line (the line between the point of the shoulders and the upper point of the hip); and equal slope to the shoulder and hip. A third of the trapezoid will be in front of the girth line (armpit!); a third in the middle; and a third from the flank (rear armpit!) to the lower point of the butt. It’s best to look at the diagram here and start applying the trapezoid to horses you depict from the side. If you have a horse with a too-straight shoulder, it will be uncomfortable to ride and its front legs will often be set under its body too much. Now, you’re not going to ride the horse you paint, but a horseman will recognize the faults. Worse, if you depict a horse with a too-long back or a too-short hip, it will look off. You might find it easier to draw a horse by sketching out the trapezoid first, and then fleshing out the rest of it. Note: Mules and donkeys have significantly different conformation than horses, with different angles to the shoulder and hip.


A sample trapezoid showing its application to shoulder and hip lengths and angles.


Understand the vast variation in horses based on breed and type. Horses have been bred for hundreds of years to meet certain performance standards. Draft horses are bred to be powerful, large, and patient. Warmbloods - a type of horse with some blood and qualities from draft horse stock, and some blood and characteristics from “hot” blood horses of Arabian descent - were bred to be war horses, and now are largely bred to be capable sport horses. Light horses - from thoroughbreds to American Quarter Horses - are bred for just about every function. Within these three basic types are hundreds of breeds that are more specific in form and function. Then, of course, we can add in the ponies and donkeys and the lovable, utilitarian hybrids, the mules and hinnies. There’s a lot to know. If you’re painting a horse in a specific role or setting, know what type or breed you’re depicting. A Shetland pony, bred to work in the mines, might be appropriate wearing a harness and hauling coal. A showy Arabian or a Clydesdale or an Akhal-Teke? Not so much! A jockey in his brightly-colored silks is not going to be on a draft horse, but the outrider next to him leading his horse to the gate might be on an Appaloosa or a Quarter Horse or any calm, reliable, confident mount. A rider can certainly run barrels on an Arabian horse, but it’s not common in the more competitive events, and a bronc rider in a rodeo won’t be on one. You don’t have to be an expert, but you have to know what you are painting. Again, I refer you to Frederic Remington, or Guericault, or Wesley Dennis. When Wesley Dennis painted Misty of Chincoteague, you knew he was painting a pony with its short legs, longer coat, and shorter, heavier head than, say, a thoroughbred. 


Use negative space to your advantage. Art is about seeing, but often what we see is overridden by the pre-determined context we have in our head. I used to see this in witnesses to crime scenes. They’d sometimes mentally fill in the blanks based on past experience / perception rather than be an objective witness. Our minds just do that. If you show someone an inverted “V” instead of an “A” in, say, the word “RAT”, they’ll read it as an “A.” It’s a mental auto-correct function of sorts. Similarly, when we look at an image, our minds do these amazing acrobatics and yield things we don’t actually see. So, to circumvent and foil this process, learn to look at negative space - the space outside the image you’re actually drawing. Your mind’s eye might see a horse a certain way; but it may not be accurate. When looking at an actual horse or a photo reference of a horse, look at the lines outside and around the horse itself. You’ll be better able to capture the lines of the ears, or the legs, or the tail carriage. Pay particular attention to the shape of the negative space between the ears, the throatlatch (the narrow point the cuts in where the horse’s neck connects to the head), the shape between the horse’s legs. This will help you get the proportions and angles correct.


Note the guidelines I added between the ears, where the ears attach to the neck and face, under the chin (throatlatch), and where the neck meets the chest. These, like the legs, are areas where focusing on negative space will help you out.


Know something about tack. If you’re painting a horse under saddle, or in harness, or wearing a pack, either study a bit about tack or artistically obscure it, or you may end up failing much as AI currently does when depicting tack. Honestly, I’ve seen artists who have painted weirdly-attached reins or saddle strings capable of competing with even the weirdest AI renditions, and let’s not forget the ridiculous journalists who were outraged over the image of the Border Patrol rider whose reins were flying in the air because they interpreted it as a “whip” being used on illegal immigrants. I’ve seen paintings where artists stuck bits or brow bands on halters, or left off critical pieces of bridles, and lord, some of you people get creative with where reins are attached. Harnesses? They can be complicated even to the savviest horsemen, because like horses themselves, harnesses are built form-to-function. A driving horse might have a breast-collar type harness or one with a collar. A wheel horse in a six-horse team will have different rigging than the lead horses, and a single horse pulling a simple cart will be harnessed completely differently than half of a two-horse hitch. Use your photo references! Also: in general, riders hold the reins in their LEFT hand, people!


AI (this one courtesy of Bing) has gotten better in recent weeks, but this is an example of the hot mess that is still AI-generated tack. A non-horseman might think this is all copacetic, but it's not even close. AI also doesn't understand horse gaits. This horse is pacing (legs on each side moving in unison).


Understand horse condition. By this I mean know how a young horse differs from an old horse, and how a skinny, unhealthy horse looks different from one in peak show condition. If you want your horse to look tired, broken-down, or old, like Don Quixote’s Rosinante, give it a concave neck (the crest, meaning the topline of the neck - hence the word “crestfallen”); a depression above the eye; a lowered, dejected headset; swollen fetlocks and pasterns in the hind legs; lower lip jutting out; a swayed back; a dejected pose - such as standing with front legs slightly under, and resting one hind leg on its toe; lack of muscle definition; a low tail position; and a lackluster coat. To give your horse vitality and youth, show it with an arched neck (the degree varies based on breed); a high or moderately-high head; well-defined legs; sinewy, defined musculature; a high, proud, tail position; and a glossy coat. You can convey a certain amount of energy in your painted or sculpted horse by understanding the horse’s emotional state and condition. 


Finally, let’s look at everyone’s favorite subject: anatomical correctness. Stallions have balls and a penis. Geldings have no balls, but still have a penis.The latter is discreetly tucked into its sheath unless it’s in a state of arousal, or is peeing, or is doped up, or - in rare situations - is suffering a health disorder. This saves you, gentle artist, from having to depict Wilbur’s Johnson. However, you must often still depict Wilbur’s sheath if the horse is positioned thusly. Yes, you will have the inevitable adolescent viewer comment on it, but a gelding or a stallion will have a visible sheath. It is shaped something like a somewhat rounded square-root symbol, or an inverted asymmetrical mound. Mares, which are female horses, have two teats, but unless they are about to give birth or are nursing their foal, these will not be visible from the side. So if you are squeamish about making your horses anatomically correct, you can always choose to paint mares. 


The sheath in all its glory. Do not fear the sheath. 


So there you have it: a few things I wish more artists would understand about horses. This is much longer than I’d intended, and could perhaps end up being a booklet or book, but may it help you in your quest to paint, or sculpt, or otherwise depict a lovely, lifelike horse. Reach out to me if you have a specific question about this content. (No, I will not evaluate your own artistic efforts!)


For further reading:


Reference book on horse anatomy (affiliate link)


Copyright (c) 2024 by Marcy J. Miller * All rights reserved * No part of this content, including pictures, may be used without the written permission of the author * Links to this post, however, may be freely shared, and are appreciated * Thank you for linking, liking, sharing, and otherwise helping grow my readership * Most of all, thank you for stopping by!